Complete Guide: MySQL Download for Windows - Step-by-Step Installation Tutorial
Discover the seamless process of downloading and installing MySQL on your Windows system with our detailed step-by-step guide. Effortlessly set up MySQL to efficiently manage databases and propel your development projects forward.
Downloading MySQL for Windows
- Navigate to the MySQL Download Page: Open your web browser and go to the official MySQL website. The URL is typically https://www.mysql.com/downloads/.
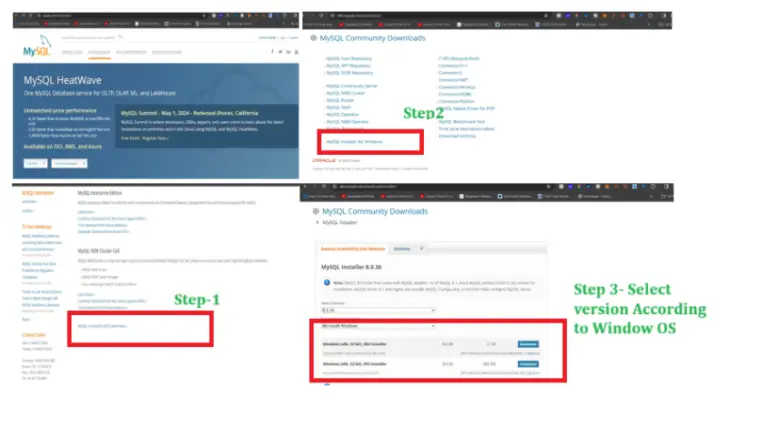
Select MySQL Community Server: On the downloads page, you’ll see various MySQL products. Choose “MySQL Community Server,” which is the open-source version of MySQL.
Choose the Right Version: MySQL offers different versions for various operating systems. Make sure to select the appropriate version for Windows. Look for a button or link that says something like “MySQL Community (GPL) Downloads”.
Select the Installer Package: You’ll typically find options for different installer packages, including web installers and full packages. It’s recommended to choose the full package, which includes all necessary components for installation.
Select the Correct Architecture: Choose either 32-bit or 64-bit based on your Windows system architecture. Most modern systems are 64-bit, but if you’re unsure, you can check by right-clicking on “This PC” or “My Computer” and selecting “Properties”.
Download the Installer: Click on the download button to begin the download process. The file size can be significant, so depending on your internet connection, it may take some time to complete.
Installing MySQL on Windows
Run the Installer: Once the download is complete, locate the downloaded file (typically ending with
.msi) and double-click it to start the installation process.Setup Wizard: The installation process will begin with a setup wizard. Click “Next” to proceed.
Choose Setup Type: You’ll be presented with setup type options. For most users, the “Server Only” option is sufficient. Select it and click “Next”.
Check Requirements: The installer will check for prerequisites and display any missing components. If any required components are missing, the installer will provide options to download and install them automatically.
Configuration: You’ll be prompted to choose a configuration type. For beginners, selecting “Server Computer” is recommended. This option configures MySQL with default settings suitable for a standalone server.
Database Configuration: Next, you’ll configure the MySQL server’s database settings. You can choose the default settings or customize them according to your requirements. At a minimum, you’ll need to set a root password. Make sure to choose a strong password and remember it, as you’ll need it to access the MySQL server.
Start MySQL Server: After configuring the database settings, the installer will prompt you to start the MySQL server. Check the box that says “Start the MySQL Server at System Startup” if you want MySQL to start automatically whenever you start your computer.
Apply Configuration: Review the configuration settings to ensure they are correct. Click “Execute” to apply the configuration and start the MySQL server.
Installation Complete: Once the installation is complete, you’ll see a confirmation screen. Click “Finish” to exit the installer.
Verifying MySQL Installation
Open Command Prompt: Press
Win + R, typecmd, and press Enter to open the Command Prompt.Navigate to MySQL Bin Directory: MySQL binaries are usually located in the
bindirectory within the MySQL installation directory. Use thecdcommand to navigate to this directory. For example:
cd C:\Program Files\MySQL\MySQL Server X.X\bin
Connect to MySQL Server: Once you’re in the MySQL bin directory, you can connect to the MySQL server using the mysql command-line client. Type the following command and press Enter:
mysql -u root -p
- You’ll be prompted to enter the root password you set during installation.
Verify Connection: If you’ve successfully connected to the MySQL server, you’ll see a MySQL prompt (
mysql>), indicating that you’re now in the MySQL command-line interface.Test Database Operations: You can now test various database operations, such as creating databases, tables, inserting data, and querying data, to ensure that MySQL is functioning correctly.
Conclusion
Congratulations! You’ve successfully downloaded and installed MySQL on your Windows system. You can now start using MySQL to manage databases for your applications or projects. Make sure to explore MySQL’s documentation and resources to learn more about its features and capabilities. Happy querying!